
Showing posts with label fairy. Show all posts
Showing posts with label fairy. Show all posts
December 30, 2011
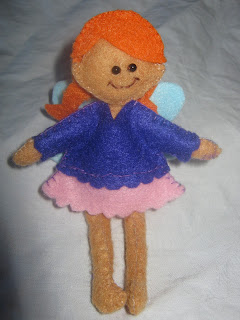
Dressed fairy doll - Day 290
A clothed fairy! I think the purple felt was too stiff though, and it doesn’t fit right. It showed my arms weren't stuffed enough, I had to jimmy jam the arms into the sleeves, which is okay if I plan to permanently stitch her into her clothes, but not very useful if I want to change them!! back to the drawing board!!

December 29, 2011
Mini fairy Doll - Day 289
A new craft attempt! Dangerous I know!!
 A mini fairy doll, with changeable outfit and a fairy house?!
This doll is about 4.5 inches tall. Im not sure if the hair is right, and I may just stitch the eyes as the beads arent quite right.
This isnt mine, my doll pattern skills are limited! This is from Nuno Life.
I had in my head to make a fairy, but was unsure how to put it together. So after a search, managed to find this. Definitely a great start, now to research other doll making tips/tricks.

This doll is about 4.5 inches tall. Im not sure if the hair is right, and I may just stitch the eyes as the beads arent quite right.
This isnt mine, my doll pattern skills are limited! This is from Nuno Life.
I had in my head to make a fairy, but was unsure how to put it together. So after a search, managed to find this. Definitely a great start, now to research other doll making tips/tricks.
December 6, 2011
Fairy Skirt - Day 266
This was a joint craft with my daughter. In fact, I started her off but she finished so I could complete bunny sets.


Oh the joys of a no sew fairy skirt!!
I have seen a few of these around, and after a slightly disastrous fairy skirt last year that frayed horrendously, I opted for the tougher tulle. No fray!!
This couldnt be easier really. The only stitching you need to do is the elastic waist band.
Once that is done, you just get a mass of strips cut from your coloured net, some matching ribbon strips and start adding them. With each long strip, double it and then slip knot around the elastic. Alternate colours and ribbon till you run out. Then settle down for a while because you need to tie the strips togehter. You take one strip (light pink) and tie to one strip of the colour next to it (dark pink), just keep going around like this. Once done, you can trim any extra long bits (my white was a much softer netting and was longer).
Another xmas present done!!


Oh the joys of a no sew fairy skirt!!
I have seen a few of these around, and after a slightly disastrous fairy skirt last year that frayed horrendously, I opted for the tougher tulle. No fray!!
This couldnt be easier really. The only stitching you need to do is the elastic waist band.
Once that is done, you just get a mass of strips cut from your coloured net, some matching ribbon strips and start adding them. With each long strip, double it and then slip knot around the elastic. Alternate colours and ribbon till you run out. Then settle down for a while because you need to tie the strips togehter. You take one strip (light pink) and tie to one strip of the colour next to it (dark pink), just keep going around like this. Once done, you can trim any extra long bits (my white was a much softer netting and was longer).
Another xmas present done!!
November 14, 2011
Name Fairy Painting - Day 244
Fairies and dragons, can't go wrong really!
 The gold paint for the dragons sparkle a bit and add a bit of shine.

June 13, 2011
Paper fun - day 90
My neighbour introduced me to her favourite accessorie... a Cricut.
At this point I need to point out I have never, and will never be a scrapbooker. Its not in my DNA. I have enough trouble just getting photos into a normal album, let alone with fancy extras! I do hold a slight admiration for those who do though, I have seen some fab things in the magazines my neighbour shares with me. Some of it is just so detailed and really captures a certain moment in time.
My neighbour has an increasing collection of goodies around this area, and also use it to make unique cards and even some art pieces for family.
The Cricut is like magic.... put in the right cartridge, add paper, press a button and it comes to live cutting out the shape you want in the size of your choice. My creative neurons are still buzzing with the potential! I played a bit with the tinkerbell set and we discovered the one thing the book misses... it doesnt tell us what the "ultimate" size is for all features to be cut probably on a layered piece (tiny lips just tore a line in paper). and if you tell it to do real size, its a suprise what that actually is (maybe we just missed something?). So, many pieces of random sizes created, including some cute fairys about 1.5" high for potential tags. In theory, the fancier side of this is cutting all the seperate layers, gluing them together for a complete look
On reflection though, I like the randomness of unfinished pieces.


At this point I need to point out I have never, and will never be a scrapbooker. Its not in my DNA. I have enough trouble just getting photos into a normal album, let alone with fancy extras! I do hold a slight admiration for those who do though, I have seen some fab things in the magazines my neighbour shares with me. Some of it is just so detailed and really captures a certain moment in time.
My neighbour has an increasing collection of goodies around this area, and also use it to make unique cards and even some art pieces for family.
The Cricut is like magic.... put in the right cartridge, add paper, press a button and it comes to live cutting out the shape you want in the size of your choice. My creative neurons are still buzzing with the potential! I played a bit with the tinkerbell set and we discovered the one thing the book misses... it doesnt tell us what the "ultimate" size is for all features to be cut probably on a layered piece (tiny lips just tore a line in paper). and if you tell it to do real size, its a suprise what that actually is (maybe we just missed something?). So, many pieces of random sizes created, including some cute fairys about 1.5" high for potential tags. In theory, the fancier side of this is cutting all the seperate layers, gluing them together for a complete look
On reflection though, I like the randomness of unfinished pieces.


May 30, 2011
Sunset Fairy - Day 76
New Painting Pre-wings!!
Another fairy destined for sparkly wings. This time the fairy is Dragon watching, a peaceful passtime at the end of the day!
This fairy has a forest green set of wings on the way.


I have also been stocking up some of the other crafty bits and pieces as I have decided to try a craft market (On Sunday! Arghhh). Ideally, some people will like some of my things and buy them. (as realistically, I need the funding to keep buying craft/art goodies!)
Another fairy destined for sparkly wings. This time the fairy is Dragon watching, a peaceful passtime at the end of the day!
This fairy has a forest green set of wings on the way.


I have also been stocking up some of the other crafty bits and pieces as I have decided to try a craft market (On Sunday! Arghhh). Ideally, some people will like some of my things and buy them. (as realistically, I need the funding to keep buying craft/art goodies!)
May 22, 2011
Wings on Moonlit night - day 67
LOTS and LOTS of contemplating on this, but decided to just do the wings in the end, which was my original plan.
The wings are single layer fantasy film so the colour is lighter then the first painting.
Am pleased with how its turned out, onto the next one!!


The wings are single layer fantasy film so the colour is lighter then the first painting.
Am pleased with how its turned out, onto the next one!!


May 12, 2011
Moonlit Painting - Day 58
A progress report...
The 'fairy' is done, she is basking in the moonlight, moon-bathing in a way.
But, now a small artistic crisis... wings vs. no wings!
Am stuck, I am so pleased with how she has turned out and, although her wings are in development and are smaller then my last, I'm wondering if turning her into a fully winged fairy will be ok. She seems happy just as she is.
 Any thoughts??
(photo not brilliant, will try for a better one later)
The 'fairy' is done, she is basking in the moonlight, moon-bathing in a way.
But, now a small artistic crisis... wings vs. no wings!
Am stuck, I am so pleased with how she has turned out and, although her wings are in development and are smaller then my last, I'm wondering if turning her into a fully winged fairy will be ok. She seems happy just as she is.

(photo not brilliant, will try for a better one later)
May 10, 2011
Moonlit background - Day 56
A full moon and clouds, just awaiting the arrival of the fairy.
I am aware the moon seems small, I might try it a tad larger, but seems to fit this size - especially when the fairy is added.
In fact, maybe I'll just state this isn't earth, and this planets moon is just tiny... yeah, that could work!

I am aware the moon seems small, I might try it a tad larger, but seems to fit this size - especially when the fairy is added.
In fact, maybe I'll just state this isn't earth, and this planets moon is just tiny... yeah, that could work!

May 9, 2011
New paintings - Day 55
Busy working day meant a shortage of free arty hours, but I started the backgrounds for the next paintings. well, its actually for the one painting I have planned, but I'm not sure what kind of background I want..

 Also, I spaced out a bit looking at cool craft on line... I remember coming across these last year and thinking it would be fun to try it, then it slipped my mind. Just refound them... "one day" I want to make the musical jacket and remote control teddy bear!! (click on picture for more details)

 Time is so short! Would welcome a "groundhog day" time jump for awhile!


Subscribe to:
Posts (Atom)