
Showing posts with label people. Show all posts
Showing posts with label people. Show all posts
December 30, 2011
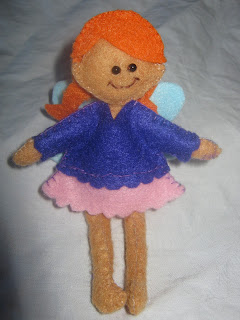
Dressed fairy doll - Day 290
A clothed fairy! I think the purple felt was too stiff though, and it doesn’t fit right. It showed my arms weren't stuffed enough, I had to jimmy jam the arms into the sleeves, which is okay if I plan to permanently stitch her into her clothes, but not very useful if I want to change them!! back to the drawing board!!
December 29, 2011
Mini fairy Doll - Day 289
A new craft attempt! Dangerous I know!!
 A mini fairy doll, with changeable outfit and a fairy house?!
This doll is about 4.5 inches tall. Im not sure if the hair is right, and I may just stitch the eyes as the beads arent quite right.
This isnt mine, my doll pattern skills are limited! This is from Nuno Life.
I had in my head to make a fairy, but was unsure how to put it together. So after a search, managed to find this. Definitely a great start, now to research other doll making tips/tricks.
December 16, 2011
Rangitoto Island - Day 276
A more cutesy simplified picture. But I'm getting the hang of layers.

For this one I had to import an actual photo of Rangitoto Island into Manga studio and use the layer tool to copy it since it has a specific shape. I like this tracing ability, has given me a few more ideas I might try later! Also a great tool to use for tricky shapes like NZ map.
Also used extra layers and masking for this piece so I didn't have the black outlines. And made good use of the light brush and blending tools for the shading.

Also used extra layers and masking for this piece so I didn't have the black outlines. And made good use of the light brush and blending tools for the shading.
December 6, 2011
Fairy Skirt - Day 266
This was a joint craft with my daughter. In fact, I started her off but she finished so I could complete bunny sets.


Oh the joys of a no sew fairy skirt!!
I have seen a few of these around, and after a slightly disastrous fairy skirt last year that frayed horrendously, I opted for the tougher tulle. No fray!!
This couldnt be easier really. The only stitching you need to do is the elastic waist band.
Once that is done, you just get a mass of strips cut from your coloured net, some matching ribbon strips and start adding them. With each long strip, double it and then slip knot around the elastic. Alternate colours and ribbon till you run out. Then settle down for a while because you need to tie the strips togehter. You take one strip (light pink) and tie to one strip of the colour next to it (dark pink), just keep going around like this. Once done, you can trim any extra long bits (my white was a much softer netting and was longer).
Another xmas present done!!
November 27, 2011
Last dora top - Day 257
Had this fabric in the scrap bag.
Due to how yesterdays turned out, I decided to just add elastic for the sleeves.

Out of the three this is my favourite. This is one I could add a pattern on here for.
Due to how yesterdays turned out, I decided to just add elastic for the sleeves.

Out of the three this is my favourite. This is one I could add a pattern on here for.
November 20, 2011
Tiger sentinal - Day 250
This is part of days 248-249. I am still trying to get the feel of the wind and sky and haven't quite got it right. So I decided to try something new and have added a tiger.
Why a tiger? This is where a blurb about the significance and symbolism of the tiger on guard next to the girl in strong wind represents the underlying message of protection, power and energy.........
but in reality, I just thought "oh, tiger, I like tigers".
Though on reflectional, this seems like they are Sentinals of some sort.

November 19, 2011
Windy Day PC - Day 248-249
I sketched out a design for a new painting, a girl caught in the wind with clothes and hair blowing and leaves twisting around.
About the same time, I was lent a couple of Imagine FX magazines to see if I could get the sample disc to work. I have always greatly, super megally, admired the people who use those great programs like photoshop and illustrator, but my first feeble attempt to learn such skills failed when i tried to learn the basics on GIMP (the free version of these). The concept of layers bewildered me and I just couldnt seem to get the program to do what I wanted with my scanned picture. Maybe the stars were in a strange alignment!!
Anyway, with the magazines in hand, I tested to see if the discs would work, and downloaded the free demo of Manga Studio just to check it out. Silly, silly thing to do!!
My artistic mode went into OCD as I "played" around to see what could be done. This lead to a number of hours, dishes piling up and a sleep deprived night, with brief stops to check online tutorials and a lot of frustrating "what the...?" moments.
Here is the start... I sketched straight onto the computer (since I tried the scanner thing last time and got lost), and dilligently watched tutorials and learnt about layers. All went fine untill the grass.. Grass is tricky!!! Some time on this part alone - ok, LOTS of time!!
Now to tackle the sky, leaves and feel of wind.!!!


November 10, 2011
Sitting Angel and apology - Day 238-240
 This is an angel, a well needed one to bless my PC.
 I have been crafting daily regardless, as per the plan 239 days ago. BUT, the PC gods had other ideas and swiftly blew my PC!! so despite my ongoing crafting goodness, I haven't blogged.
This has caused a fair bit of stress, no working internet at home!!
How can a human of this day and age possibly cope!! Well, the break actually was nice. But I cant say enough how happy I am to have it all fixed!! (took a bit of saving to do!)
 It is now a matter of catching up online with my paper tracked 365. Hence this angel!! This has been days 238-240. This is all paper mache. A cardboard cone, then thick tissue paper mache to shape the angel legs and body, then painted and glittered. The glitter/glue ratio wasn't quite right so the wings are patchy. Will need to fill the gaps. Was really pleased with how this turned out. Its quite solid too.
October 29, 2011
Sims Animator - Day 228
Repeating craft day, finishing up pieces.
Thought I'd take the time to say well done to the teenage animator I know...
Thought I'd take the time to say well done to the teenage animator I know...
September 28, 2011
Old McDonald set - Day 197
This hand puppet is part of a birthday present for a pre-school teacher, by her request. This is Old McDonald!

He took a bit of thinking and design because I wanted a pocket to put the finger puppet animals in. Have managed to do this in the back, his shorts and shirt are a pocket. So, in a way, the answer to the question "where is your cow?" is... "Down my shorts!!" :) Have one cow made so far, now for the rest...

He took a bit of thinking and design because I wanted a pocket to put the finger puppet animals in. Have managed to do this in the back, his shorts and shirt are a pocket. So, in a way, the answer to the question "where is your cow?" is... "Down my shorts!!" :) Have one cow made so far, now for the rest...
July 6, 2011
Fairy Clock - Day 113
Need a cheap clock, but the cheap doller shop one is boring?
Then design your own background!
I pulled it apart and used the circle as a template. I then got a picture of a fairy and got a jnr to help me colour. Stick the numbers in the right place and put back together.

Then design your own background!
I pulled it apart and used the circle as a template. I then got a picture of a fairy and got a jnr to help me colour. Stick the numbers in the right place and put back together.

June 25, 2011
Learning - day 102
I want to learn photoshop, illustrator etc, but as of yet am settling for the cheaper (free) GIMP program to learn some basics. SO much harder then I thought!
I decided to follow a tutorial on how to colour a black and white sketch, it took so much playing around with many layers and trying to work out how the layers work together.
Its very messy, but its a start (has to improve, as can't get worse!)
In the end, used a GIMP tool too emboss the image as well (hides the terrible colouring)


June 7, 2011
Full of Feelings - Day 84
My daughter hung this blank canvas on a spare spot on the wall (cant beat a white snow scene!), and after awhile, this is what came to mind.
Its a big bright piece which is just a bit of fun. Some of the expressions are obvious, some others are adaptable.
Acrylic 18" by 18"


Its a big bright piece which is just a bit of fun. Some of the expressions are obvious, some others are adaptable.
Acrylic 18" by 18"


May 22, 2011
Voodoo Mini - Day 68
Another little felt creation. A mini voodoo doll to end a stressful week.
Not that I would EVER wish harm on anyone... its just sometimes the whole 'bad-karma-coming-back-to-them' theory doesnt work fast enough for some horrid people.


Not that I would EVER wish harm on anyone... its just sometimes the whole 'bad-karma-coming-back-to-them' theory doesnt work fast enough for some horrid people.


Portrait watercolour - Day 63
After a success last week with the Justiung bieber painting (well recieved by a bieber fan!!), i thought I would try again with a family picture.
Didnt turn out as well, but still perfecting technique.

Didnt turn out as well, but still perfecting technique.

Princess Finger puppet - Day 62
As part of a castle set, I am developing little felt characters. I decided to try it as a finger puppet first to see how it looked. I think a set of finger puppets might be quite cool, will need to play around with a dragon, knight and wizard next.

(Due 16 May, late due to life)

(Due 16 May, late due to life)
May 13, 2011
Bieber watercolour - day 59
 This is a fixed up version of Day 57.
So, after discovering that wax didn't really work well, I redid it with masking fluid. Much easier to use!
I just had the printed picture behind the watercolour paper on the window (my sophisticated version of a light box), and painted the masking fluid on the white areas of the face. This has to be done quickly, I found the brush would start to set and I had to pull off little bits, and it also pulled bits of the latex off the picture if I had to go over it.
Once this is dry, just put on watercolour washes, dry completely and very gently, use a eraser to rub at the edges and remove the mask. dont get over zealous and pull too much off at once, mine caught the paper at one spot and started to take the paper with it.
May 12, 2011
Moonlit Painting - Day 58
A progress report...
The 'fairy' is done, she is basking in the moonlight, moon-bathing in a way.
But, now a small artistic crisis... wings vs. no wings!
Am stuck, I am so pleased with how she has turned out and, although her wings are in development and are smaller then my last, I'm wondering if turning her into a fully winged fairy will be ok. She seems happy just as she is.
 Any thoughts??
(photo not brilliant, will try for a better one later)
The 'fairy' is done, she is basking in the moonlight, moon-bathing in a way.
But, now a small artistic crisis... wings vs. no wings!
Am stuck, I am so pleased with how she has turned out and, although her wings are in development and are smaller then my last, I'm wondering if turning her into a fully winged fairy will be ok. She seems happy just as she is.

(photo not brilliant, will try for a better one later)
May 11, 2011
Watercolour Experiment - Day 57
I decided to try a quick portrait picture using watercolours and masking fluid.
But, since I didn't have any of this, I took the advice of a fab painter and tried to use wax. The problem is the wax I have is a tea light candle, and the wax dries very fast! The wax also clumps!
I did a quick attempt using a J.Bieber picture.. and quickly decided no more wax!!
Next one should be better.. I now have some masking fluid!! (Super thanks to Juls!!)

May 8, 2011
Princess Dress - Day 53-54
This dress has been in the wings for awhile. I put it off a tad longer then I should have, but, as this was for a young girls birthday present, I couldnt put it off much longer!! silly really, as this is about the 6th one of these I've made!
The reason for the delay......a sewing machine suffering from bipolar or split personality.... in fact, it could just be possessed!!
 All in all though, with hours of attention, the dress is complete. The photos are a bit rough, but you can see the main parts. It has a scalloped overskirt, big sash that ties at the back, seperate sleeves (with lace, ribbon and buttons) and metres of fabric gathered to make a very full skirt.


The reason for the delay......a sewing machine suffering from bipolar or split personality.... in fact, it could just be possessed!!


Subscribe to:
Posts (Atom)